
A new update for RGH(Reset Glitch Hack) is coming, hardwareEditing of the
The Xbox 360 console would have gone almost quietly at the beginning of last month.

The new variant barely needs two welds, and no chips are required to perform the Glitch (the modification takes place through the SMC core hack), which makes the installation as simple as it is stable, like the J-TAG modification.
This new method ensures that most, if not all compatible Microsoft Xbox 360 consoles (except for Winchesters) can be modified with RGH, and with results that mainly return INSTABOOT.
Requirements
- Tool for opening the Xbox 360 console (recommended, but not required).
- A NAND player: LPT (slower), NAND-X or JR-Programmer (better) or XFlasher (best).
- Approx. 50 cm 28 AWG or thinner wire.
- ALL FAT models: 1x diode 1n4148 (or similar).
- Resistor:
- ALL FAT models: 10k resistor: (brown, black, orange, yellow)
- Trinity: Resistor 3K OHM: (brown, black, orange, gold)
- Crown: Resistor 1K OHM: (brown, black, red, gold)
- Crown V3/V4: Post Fix adapter
- End-point welding.
- A very firm hand and experience in welding (recommended).
- An Xbox 360 (eh!).
Execution of RGH 3.0
- Install your favorite NAND programming tool.
- Install the appropriate cables and the required resistors/diodes (see the items required above) for RGH 3.
- Follow the J-Runner guide (easier) or previous RGH2-3 converter guide (more difficult).
Step 1: Connect your preferred NAND programmer to your Xbox 360 console.
Requirements
- A computer with an LPT port (print holder)
- Welder
- Find Wire for Welding
- 1x LPT plug (DB25)
- 5 resistors from 100 Ohm
- 1x switching diodes 1N4148 (switching diodes 1N914 also work where 1N4148 diodes are mentioned)
Optional: heat shrink sheath or insulating tape - Open the console type below for a diagram on how to build and connect the programmer to your console.
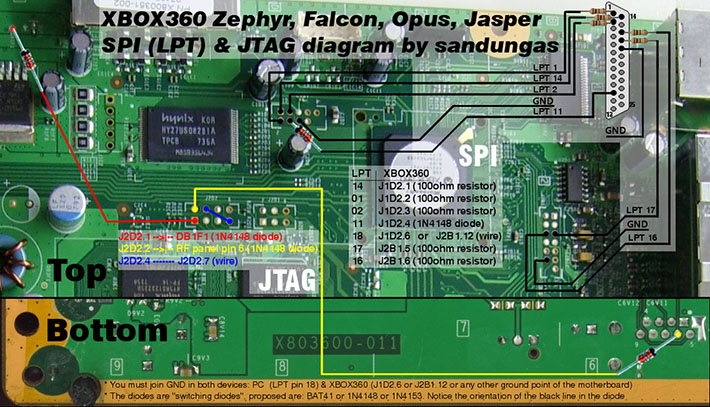
LPT FAT
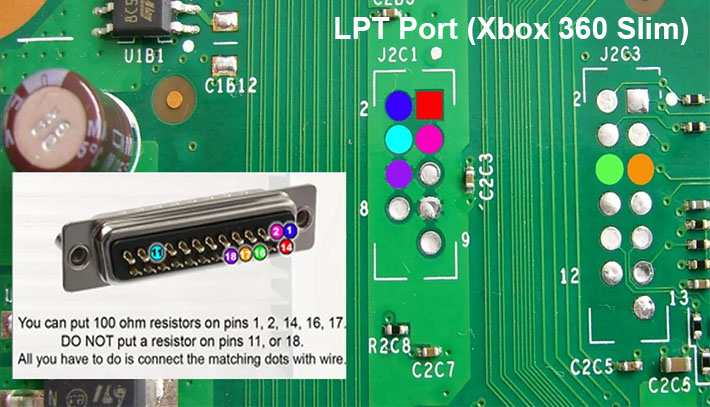
LPT Slim
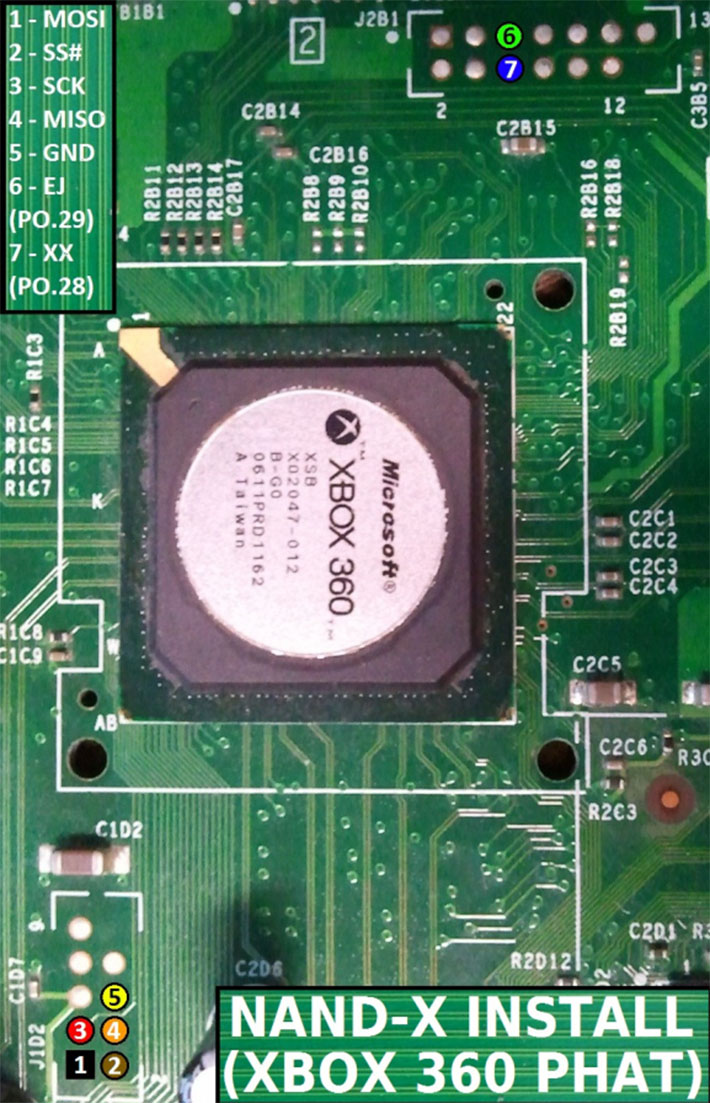
NAND-X/JR-Programmer/X-Flasher
FAT
Slim Trinity/Corona non 4G models
Slim
X-Flasher 4GB Crown diagram (NAND/eMMC integrated)
4GB eMMC

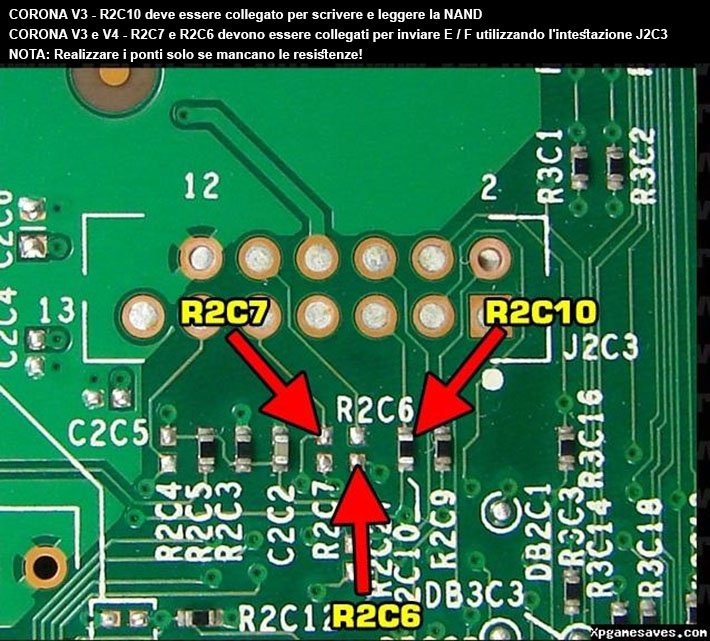
Important: For the V3 and V4 Crowns check the extra information below about NAND ABILITATION in reading and writing!
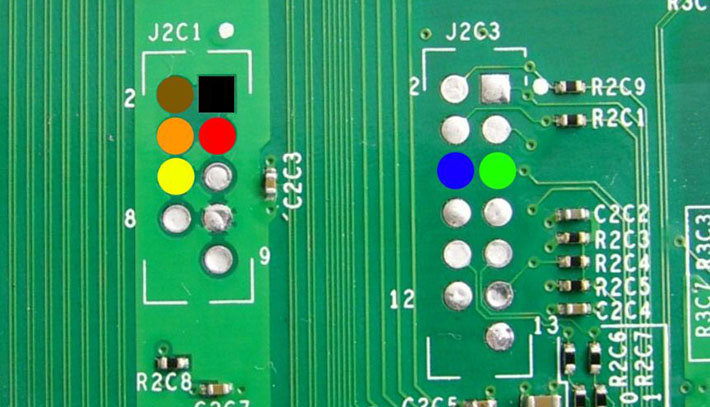
Enables reading/write on Corona
As explained in the photo below, check the resistor pads under J2C3. Follow as explained by the image text, depending on the version of the card.
After connecting the NAND player cables, refer to the following images in the correct console reviewer. Connect each point as shown in the images.
Important: Make sure the points are connected correctly and pay close attention. The dots are extremely delicate and can be easily connected to other points that could damage the console.
Points RGH 3.0
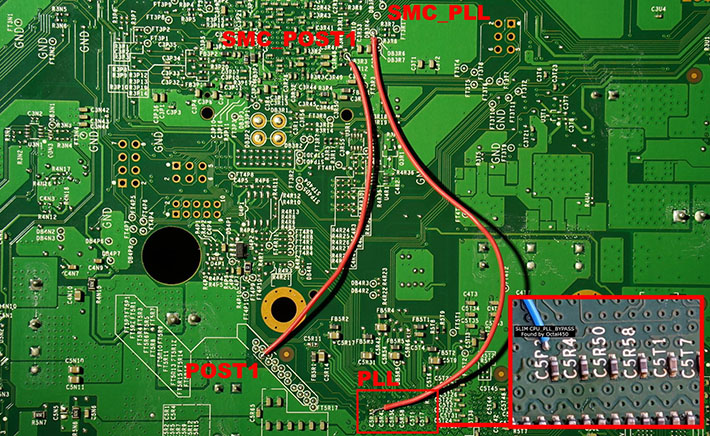
FAT
Jasper / Falcon
Recommended: Place a 10K resistor on the PLL point and weld the wire to the other side of the resistor. Also place a diode on the POST point and connect the cable to the diode.
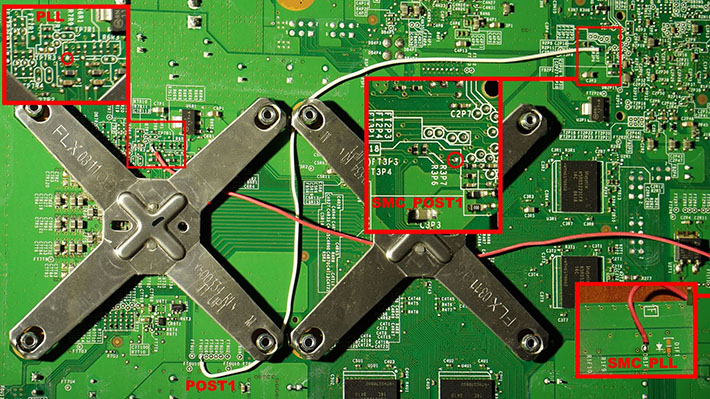
Slim
Trinity and Trinity
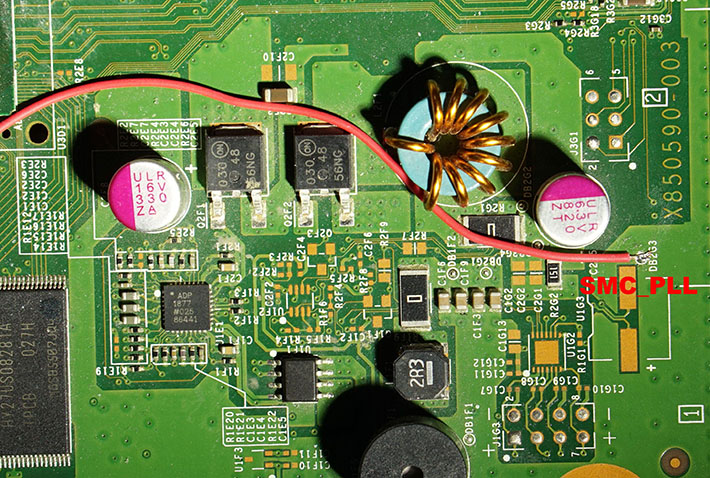
Recommended: Place a 3K resistor on the PLL point and weld the wire to the other side of the resistor. The final installation is presented as follows:

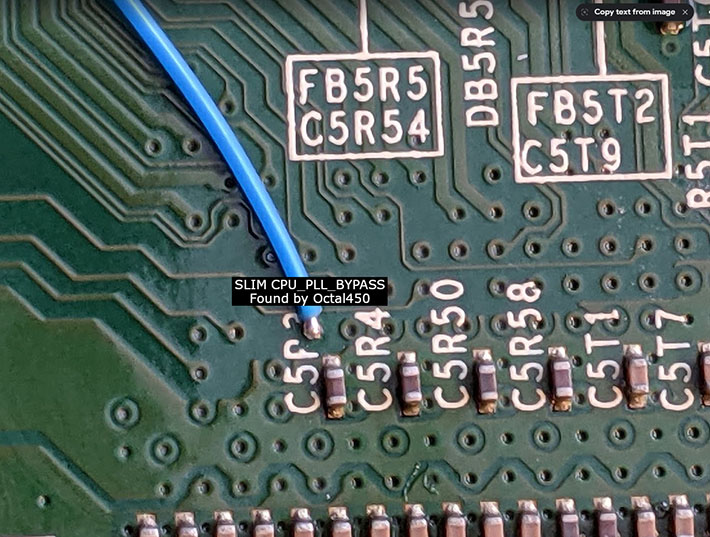
Enlarged points

Point PLL Trinity
The other end of the PLL wire goes to the small stit do near C5R54. You must first scrape the coating away to expose the track on the board.
Warning: This must be done gently so that the card does not damage the card.
the Crown
If you are trying a Crown V3 or V4, you will NEASE APOST POST FIX ADAPTER.
Recommended: Place a 3K resistor on the PLL point and weld the wire to the other side of the resistor.
Once you are sure that the points are connected correctly and your NAND player is installed, it’s time to finish.
Follow the next steps to create and flash the NAND RGH3.
RGH3: NAND construction and flashing
There are currently two methods:
- The easiest way to use J-Runner with Extra (now recommended).
- The most difficult way for legacy with J-Runner and the NAND tool from RGH2 to RGH3.
In both methods, you must download and use the latest version of J-Runner with Extra. If you already own J-Runner with Extra, it will update automatically.
J-Runner with extra (simple mode)
Step 1
- Connect the NAND player to the console
- DO NOT ACCEMPLE XBOX 360 STRENGTHEN MARE THE NAND PROGRAMMER IS CONNECTED. YOU CAN DANNING THE CONSOLE AND/OR THE PROGRAMMER.
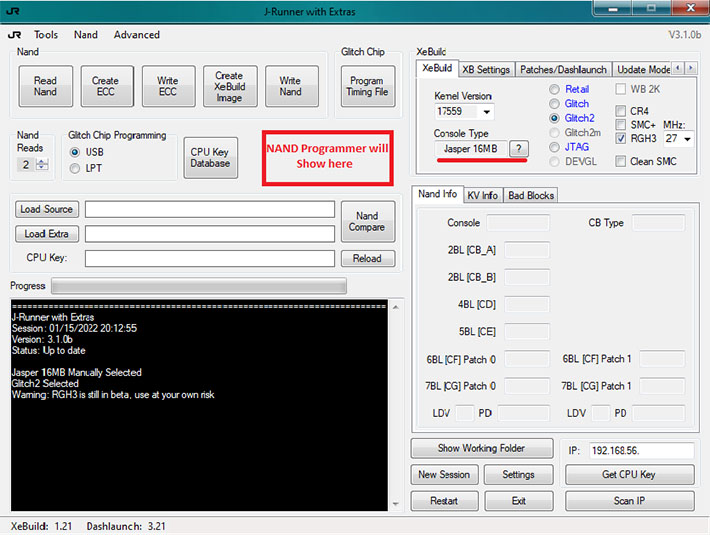
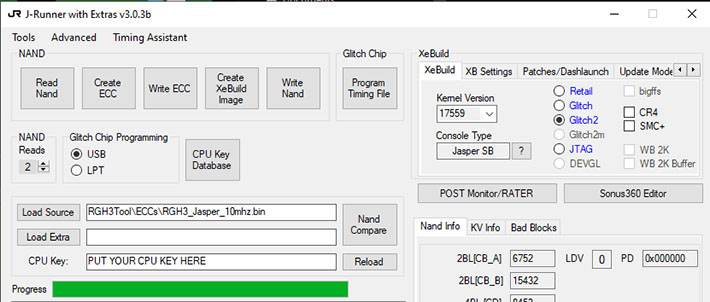
- Open J-Runner with extra. It should automatically detect the preferred NAND player and display the console type in the “Console Type” box at the top right.
- If not, press the button
?to make sure the programmer can see the console correctly. - If you don’t get a result, check the programmer’s cables before continuing.
Read 2 copies of the existing NAND by twice the “Read NAND” button, wait until it finishes the first time, then press the “Read NAND” button again.
After backing up the NAND Retail, withdraw the CPU key. This is done by Xell Reloaded.
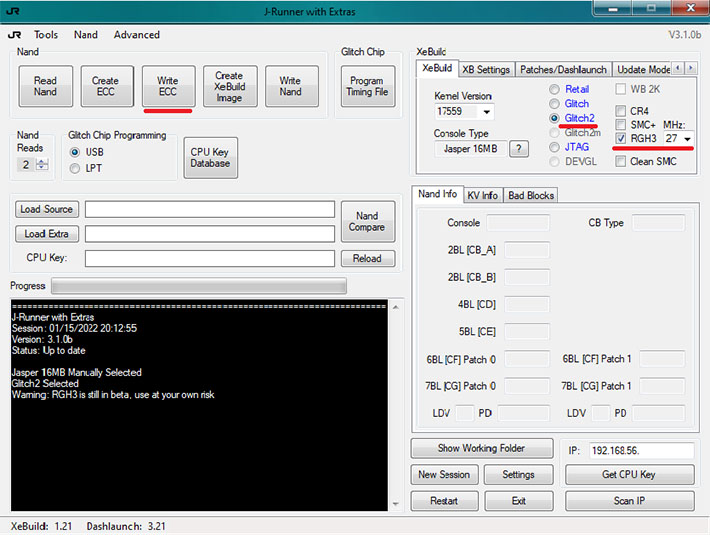
Make sure that the type of console shows the type of console, select “Glitch2,” and then select the RGH3 check box as shown below. Press “Write ECC” and wait until it ends.
Note: If the MHZ option is displayed with the drop-down menu, try 10 first. If you start slowly or do not start, try 27.
Unconnect the NAND programmer from the console and press the Eject button to start the console in XELL Reloaded. If everything went well with the installation of RGH 3.0, you should now see XELL Reloaded on the screen.
This should only take up to 2 minutes. If it takes more than 60 seconds on average, try an alternative timing file first as explained above.
Once the console starts in XELL Reloaded. Write down the CPU key and insert it in the CPU Key section in J-Runner. Now you will see the details of the console.
Now we will build the NAND RGH3
Make sure that the type of console shows the real type of console, select “Glitch2”, and then select the RGH3 check box as shown in the image above.
This time, press “Create XeBuild Image” and wait for it to end. If the MHZ option is displayed with the drop-down menu, try 10 first. If you start slowly or do not start, try 27.
J-Runner will automatically select the new NAND RGH3. If you haven’t already, turn off your Xbox console, reconnect the NAND programmer, and then click the “Write NAND” button to flash the new NAND RGH3 on your console.
Legacy Way (RGH2-3 Conversion Instrument)
First, make sure you have J-Runner with Extra. You’ll need this tool to read/write the NAND and prepare the nand built with RGH2 that you’ll convert later in the guide.
Download the conversion tool from RGH 2 to RGH 3 from this link (the tool has some POSITIVE FALSE, but it is still virus-free).
Step 1
- Connect the NAND player to
- DO NOT ACCEMPLE XBOX 360 STRENGTHEN MARE THE NAND PROGRAMMER IS CONNECTED. YOU CAN DANNING THE CONSOLE AND/OR THE PROGRAMMER.
- Open J-Runner with extra. It should automatically detect the preferred NAND player and display the console type in the “Console Type” box at the top right.
- If not, press the button
?to make sure the programmer can see the console correctly. - If you don’t get a result, check the programmer’s cables before continuing.
Read 2 copies of the existing NAND by twice the “Read NAND” button, wait until it finishes the first time, then press the “Read NAND” button again.
Extract the RGH3.0 tool in a folder on the
Drag and drop the ECC file containing the name of the tab review in the J-Runner “Load Source” box and press the Write NAND button.
The name of the ECC file depends on the console:
- Models Corona not 4 GB, use the file
RGH3_Corona.bin - 4 GB Corona models use the file
RGH3_Corona_4G.bin - Models Trinity use the file
RGH3_Trinity.bin
For FAT models, use the RGH3 file with the motherboard revision in:
- For example: I am installing RGH3 on a Jasper, so I use first
RGH3_Jasper_10mhz.bin. . - If you don’t start instantly or take longer to boot, I use instead
RGH3_Jasper_27mhz.bin. .
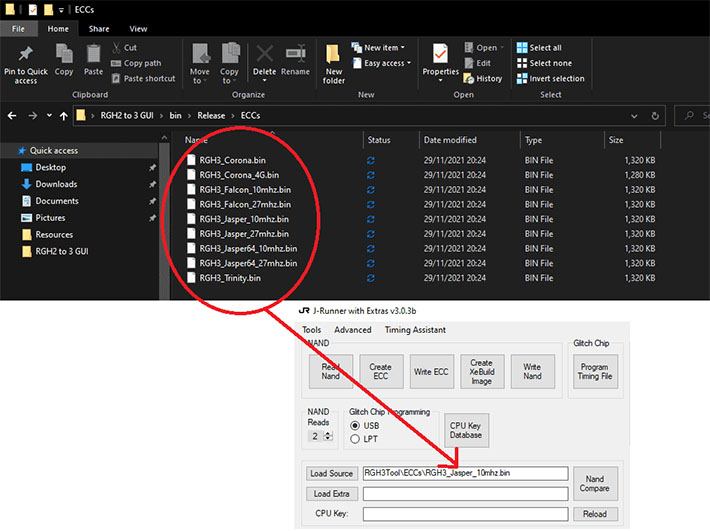
Flash this on the console by dragging it into the Load Source box in J-Runner and pressing “Write NAND”.
Next: Unsubsret the NAND programmer from the console and press the Eject button to start the console in XELL Reloaded.
If everything went well with the installation of RGH 3.0, you should now see XELL Reloaded on the screen.
This should only take up to 2 minutes. If it takes more than 60 seconds on average, try an alternative timing file first as explained above.
Once the console starts in XELL Reloaded. Write down the CPU key and insert it in the CPU Key section in J-Runner, then create a new NAND RGH 2.0:
Select “Glitch2”, make sure that “Kernel Version” reports “17559”, press the “Create XEBuild Image” button.
Warning: DO NOT FLASH THE FILE RGH2!
Now it’s time to convert the NAND RGH2 to RGH3:
The new RGH3 NAND Creator tool is by far the easiest way to convert NAND RGH2 to RGH3. If you get stuck, read the status message in the app. He’ll tell you what you’re doing wrong.
Use of RGH3 Tool
Open the “RGH2 to 3 GUI” program in the RGH 3 tool folder.
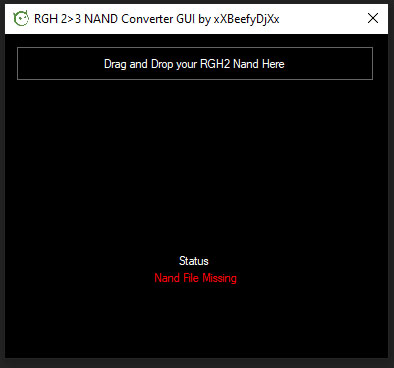
Drag and drop the NAND RGH2 file that J-Runner created earlier in the “Drag and Drop your RGH2 NAND here” section.
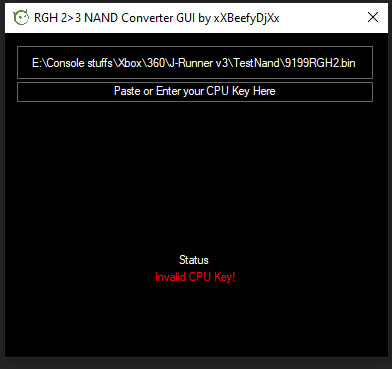
Insert your CPU key (you can also copy and paste there if it is easier).
Select the Xbox 360 console model.
FAT model
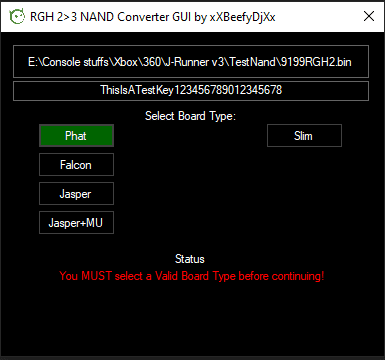
Select the type of motherboard.
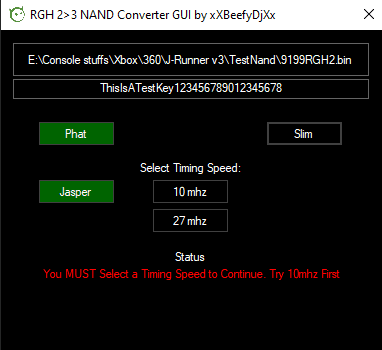
Select 10 mhz first and try it out. If the console does not start or has not been successful with Xell at 10 MHz, use 27 MHZ instead.
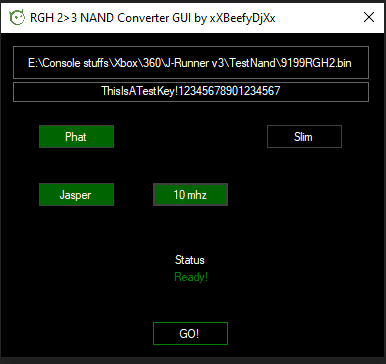
- Finally click on the GO!
Slim model
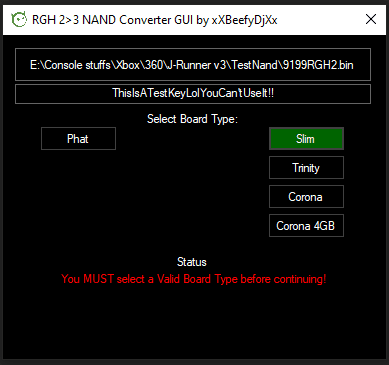
Select the type of motherboard.
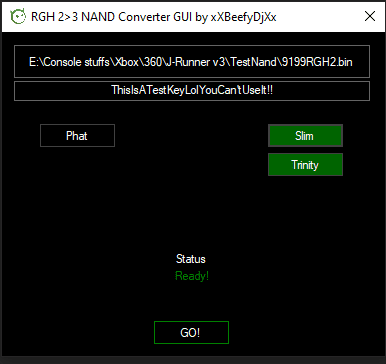
- Finally click on the GO!
Once the tool has finished creating the NAND, it will appear in the RGH3Tool folder next to the executable. If you need to rebuild the NAND, or create another NAND, press Reset to start over.

If it has not already been done, turn off the
Use J-Runner to write the newly created RGH3NAND file on the console by dragging the file RGH3NAND.binin the J-Runner Load Source box as shown below, then press “Write NAND”.

Once finished, use the power button to attempt to start the modified console with RGH3. Make sure you disconnect the NAND programmer first!
Once finished, the console will be ready. Unsconnect the NAND programmer and attempt to start using the power button. Within about 60 seconds, you should start the dashboard.
Most consoles will run Instaboot, you may need to try different times and/or resistor values.
As long as it starts, you’re free to come back and enjoy your new one
Credits / .
- 15432 – RGH3.0
- DrSchottky – NAND tool from RGH2 to RGH3.0 (connect to GitHub)
- xXBeefyDjXx – RGH2 to RGH3.0
- The Project Liberation Team
We would like to thank Massimo Carofano for contacting us, the whole team of se7ensins and the developers involved.
Source: se7ensins.com