
Việc thay đổi diện mạo nhân vật (Texture Modding) trong các tựa game AAA sử dụng Unreal Engine 4 (UE4) yêu cầu một quy trình kỹ thuật khắt khe để đảm bảo tệp tin sau khi chỉnh sửa có thể hiển thị chính xác trên phần cứng. Dưới đây là quy trình chuẩn được tổng hợp từ các chuyên gia Modding trên GameBanana.
1. Bộ công cụ cần chuẩn bị
Để bắt đầu, bạn cần thiết lập một môi trường làm việc bao gồm:
- UE Viewer (UModel): Dùng để trích xuất tài nguyên gốc.
- Unreal Engine (Phiên bản 4.19 và 4.23): Dùng để đóng gói (Cook) lại tài nguyên theo chuẩn của engine.
- Noesis & Plugin UE4 Tiling: Công cụ quan trọng nhất để xử lý “Swizzling” (định dạng lại vector hình ảnh cho GPU).
- UnrealPak: Dùng để đóng gói thư mục mod thành file
.pak. - Photoshop hoặc GIMP: Dùng để chỉnh sửa hình ảnh trực tiếp.
2. Quy trình thực hiện chi tiết
Bước 1: Trích xuất và Chỉnh sửa
Sử dụng UE Viewer để mở thư mục game. Tìm đến đường dẫn chứa texture của nhân vật (thường nằm trong Content/Design/Character/...). Xuất file texture dưới định dạng .dds để giữ nguyên các lớp Alpha (độ trong suốt). Sau đó, dùng Photoshop để thay đổi màu sắc hoặc họa tiết theo ý muốn.
Bước 2: Xử lý qua Unreal Engine 4.19
Đưa file ảnh đã sửa vào một project trong UE 4.19. Đây là bước đệm để thiết lập các thông số kỹ thuật:
- Compression Settings: Chọn
UserInterface2D (RGBA)hoặcDefault. - Mip Gen Settings: Chọn NoMipmaps (Bắt buộc, nếu có Mipmaps game thường sẽ bị crash).
- Texture Group: Chọn
UI. - Chạy lệnh Cook Content for Windows để nhận được tệp
.uassetvà.uexp.
Bước 3: Swizzling (Định dạng cho GPU)
Đây là bước tạo nên sự khác biệt. GPU của các dòng máy console hoặc PC hiện đại yêu cầu dữ liệu hình ảnh phải được “sắp xếp” lại.
- Sử dụng công cụ Noesis kết hợp với script
Swizzle.cmd. - Kéo tệp
.uassetvừa cook vào script để tạo ra một file PNG mới. File này trông sẽ rất lạ mắt nhưng đó mới là định dạng chuẩn để máy đọc.
Bước 4: Đóng gói lần cuối với Unreal Engine 4.23
Tạo một project trong UE 4.23, đưa file PNG đã “Swizzle” ở bước 3 vào. Thiết lập lại thông số tương tự bước 2 và chạy Cook Content một lần nữa. Lúc này, bạn đã có tệp tài nguyên hoàn chỉnh sẵn sàng để đưa vào game.
Bước 5: Repack và Cài đặt
- Tạo cấu trúc thư mục y hệt như trong bộ cài gốc của game (ví dụ:
MyMod/Project/Content/Design/...). - Sử dụng UnrealPak để nén thư mục
MyModthành file.pak. - Với máy PS4 Jailbreak, bạn có thể đóng gói file này vào một bản Patch FPKG để cài đặt qua Debug Settings.
3. Lưu ý dành cho Quản trị viên (chepgame.net)
- Quản lý dữ liệu: Với số lượng sản phẩm khổng lồ trên hệ thống, bạn có thể sử dụng các script Python để tự động hóa việc di chuyển tệp giữa các công cụ Cook của UE4, giúp tiết kiệm thời gian tối đa.
- Lưu trữ: Luôn lưu trữ các tệp
.uassetgốc trên hệ thống NAS Xpenology để có thể chỉnh sửa lại nhanh chóng khi game có các bản cập nhật mới. - Tối ưu SEO: Khi đăng tải các bản Mod này, hãy chú ý các từ khóa: Unreal Engine 4 Modding, Cách mod texture game, UE4 Swizzling tutorial, Mod game PS4 Jailbreak.
Hy vọng bài viết này cung cấp cho bạn một cái nhìn sâu sắc và chuyên nghiệp về quy trình modding hiện đại. Chúc website của bạn ngày càng phát triển với những nội dung chất lượng!
Introduction
This guide is intended to show users how to replace textures/create texture mods for Shin Megami Tensei V for Switch.
For a video guide, see Saitsu’s texture import video tutorial here.
This will assume that you have zero to little knowledge on how to mod Unreal Engine 4 games, but will assume that you know how to edit textures.
I’m going to start with a relatively basic texture mod: giving Oberon a palette swap, because he’s one of my favorite Megaten mainstays.
I will be using this as the example throughout, but the same process will apply for any textures you want to edit.
Tools Needed
- UnrealPak – For unpacking and repacking Unreal Engine 4 .paks. Download here.
- UE Viewer (also known as UModel) – Asset viewer and exporter for Unreal Engine games. Download here.
- The Noesis UE4 Tiling Texture plugin – For swizzling the textures and making texture mods work ingame. The plugin uses Noesis in particular because apparently, Noesis has a hidden function for tiling UE4 game textures.
- Unreal Engine 4.19 and 4.23 – 4.19 is the version that can work with the necessary Noesis plugin, and 4.23 is the version SMTV was actually developed with.
- Unverum (optional) – For managing mod .paks for SMTV. Download the latest releases here or on Gamebanana.
Downloading UE4
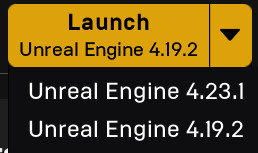
You can download Unreal Engine from the Epic Games Launcher itself. Once you have it installed, you can log in with an Epic Games account and simply download whichever versions you need by going to the Unreal Engine tab on the left and then Library at the top.
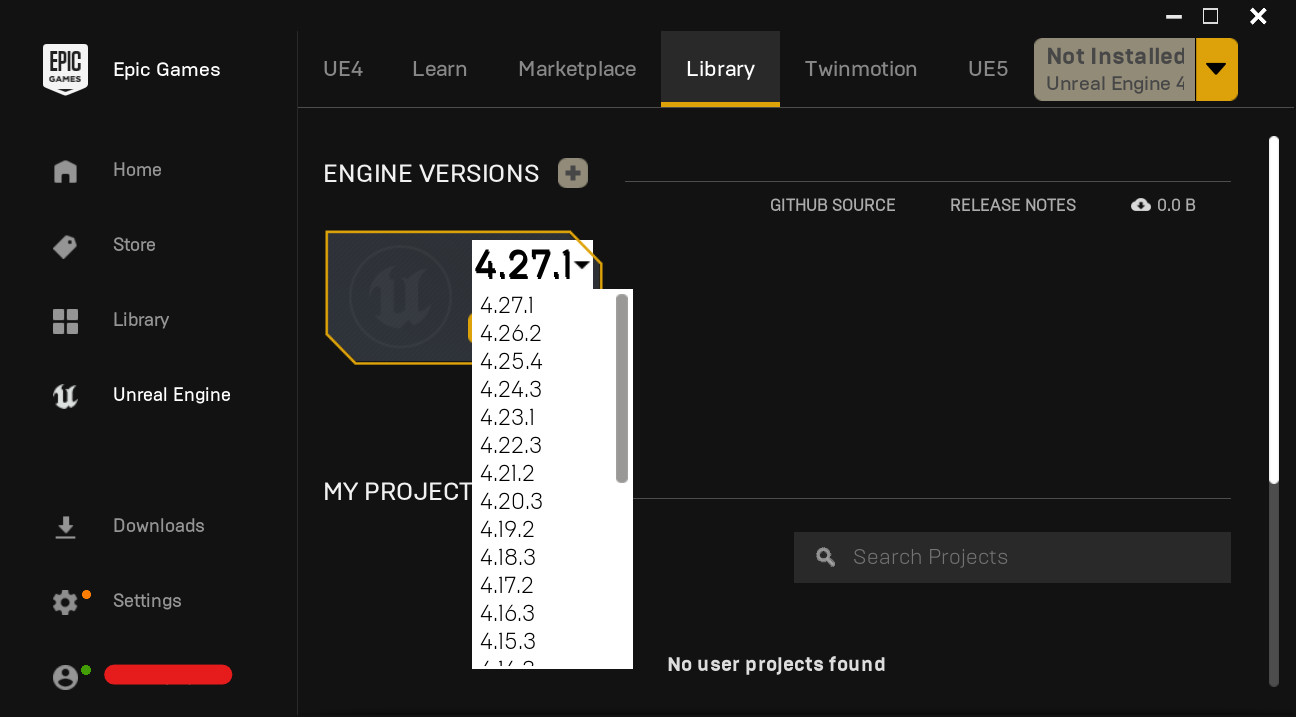
We will need to download 2 versions of Unreal Engine:
- 4.19.x, for the texture swizzling plugin
- 4.23.x, to pack it into the actual game itself
The x’s in the version numbers I stated above mean that any revision will do, as long as you get both 4.19 and 4.23.
Exporting Textures
If you’re looking into how to unpack the game, read ShrineFox’s guide here.
To explore the game’s assets, use UE Viewer. Navigate to the romfs directory and check to make sure the settings are as outlined and underlined in red below:
- Override game detection: Checkbox is checked.
- Unreal engine 4
- Unreal engine 4.23
- Platform: “Nintendo Switch”
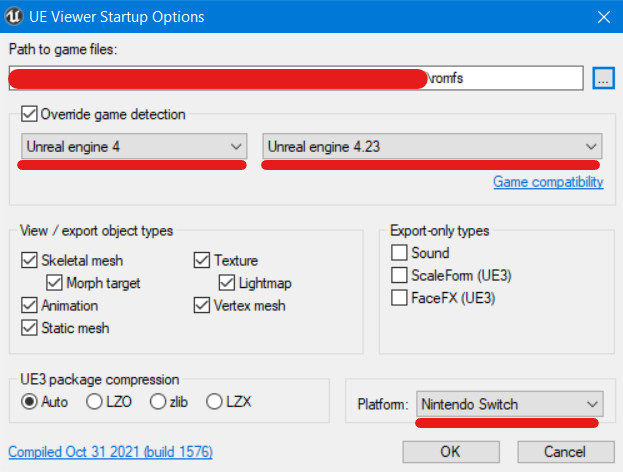
If it prompts you to enter an AES encryption key, do so.
After opening up the game’s romfs in UE Viewer, navigate to the texture you want to edit, which are mostly in Project/Content/Design/. Since I’m looking to edit a character model, the /Character/ folder it is for me. The subfolders in /Character/, for the most part, are self-explanatory:
- Common – Assets related to the mob/nondescript NPCs mentioned below, such as animations.
- Devil – Assets for demons, hee ho.
- Mob – Nondescript NPCs like the random students in school at the beginning of the game.
- NPC – Assets for notable NPCs like Tao, Shohei, Sophia, Hayao, etc.
- Player – Assets for the player character such as the Nahobino model, etc.
- Prop – Item model assets.
Note that you can also press O to bring up the project navigator and open another package anytime.
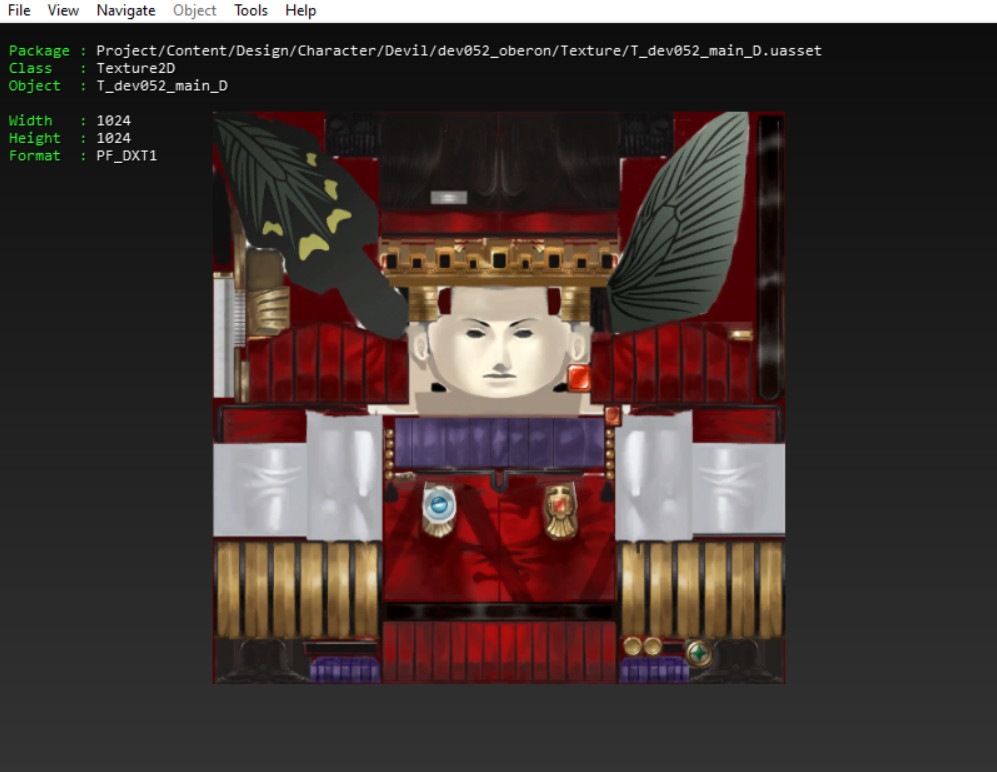
Since I’m just looking to replace Oberon’s texture, I’ll go to Project/Content/Design/Character/Devil/dev052_oberon/Texture/.
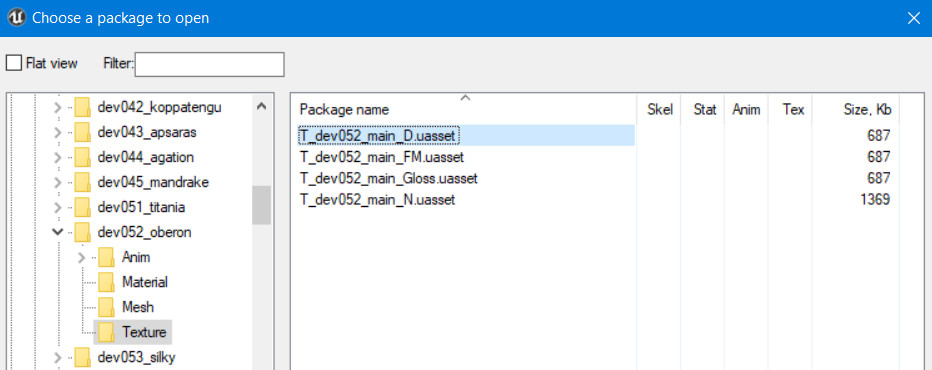
As you can see, in each “main” folder for an asset, there are several subfolders for each type, such as Anim(ations), Meshes, Textures, and so on. In the /Texture/ folder, locate the texture (.uasset file) you want to edit.
In my case, this is T_dev052_main_D.uasset.
Export the texture either by going to the top menu and Tools > Export current object (Ctrl+X), or by exporting it through the project explorer.

However you do it, the Export window should pop up.
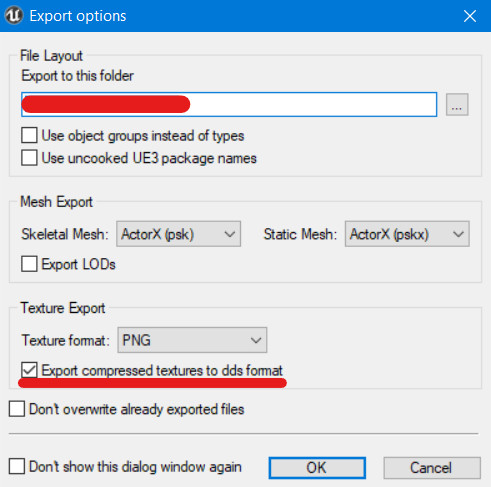
Export it as a DDS by checking the “Export compressed textures to dds format” box underneath.
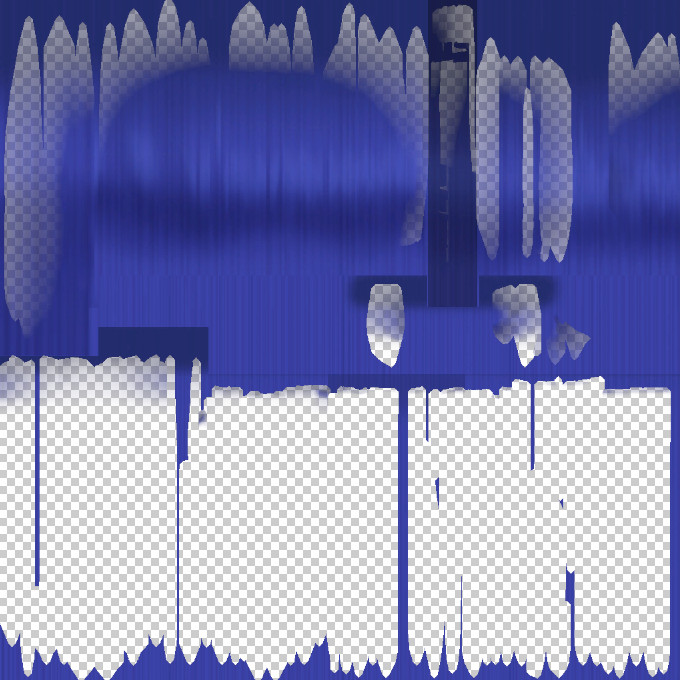
This is because exporting it directly as a PNG will turn any alpha the texture might have into transparency. If you do that with textures that have alpha, such as Nahobino’s hair, you might end up with cases like this:
Note that exporting the DDS will create the necessary folder structure along with it.
For example, since I’ve lazily exported it to Desktop directly, the actual DDS file will be in Desktop/Design/Character/Devil/dev052_oberon/Texture/.
Now that we have the DDS file, we can edit it in any image editing program that can handle DDSes, such as Photoshop.
Edit the DDS to your heart’s desire, and after that, save it as whatever you’d like. The file format doesn’t matter for importing into 4.19. You could even use a PSD.
For Textures That Have Alpha
Some textures, such as Nahobino’s hair, contain alpha, as seen above. Make sure to save the alpha channel to another file, because the Noesis plugin that makes textures work ingame only exports as PNG, so the plugin essentially kills any alpha channel that the texture might have upon exporting.
If you load it via Photoshop, it may prompt you to load the DDS’s transparency as an alpha channel (“This File contains Transparency”). If that happens, check the box and press OK to do just that.
Generally, if you’re doing a recolor, you don’t need to save the alpha separately, as the alpha is already correct.
If the texture you want to edit originally has alpha, the overall process is:
- Export texture with UE Viewer
- Open texture in image editor
- Separate alpha channel from the texture via exploring the channels in Photoshop (or whichever image editor you use), and paste it into another image file
- Cook both textures separately via 4.19 (read on below)
- Swizzle both textures separately via the Noesis plugin
- Using an image editor, combine the separate swizzled textures into one, by pasting the swizzled alpha as an alpha channel
- Now that the alpha and original textures are combined (and swizzled), chuck the combined texture into 4.23 for cooking
Cooking the Texture via UE 4.19
What we’re mostly interested in using 4.19 for is saving the texture with the correct settings, for use with the Noesis swizzling plugin.
Drag and drop the edited texture onto the bottom window of Unreal Engine 4.19, and you should see it pop up in the Content Browser at the bottom.
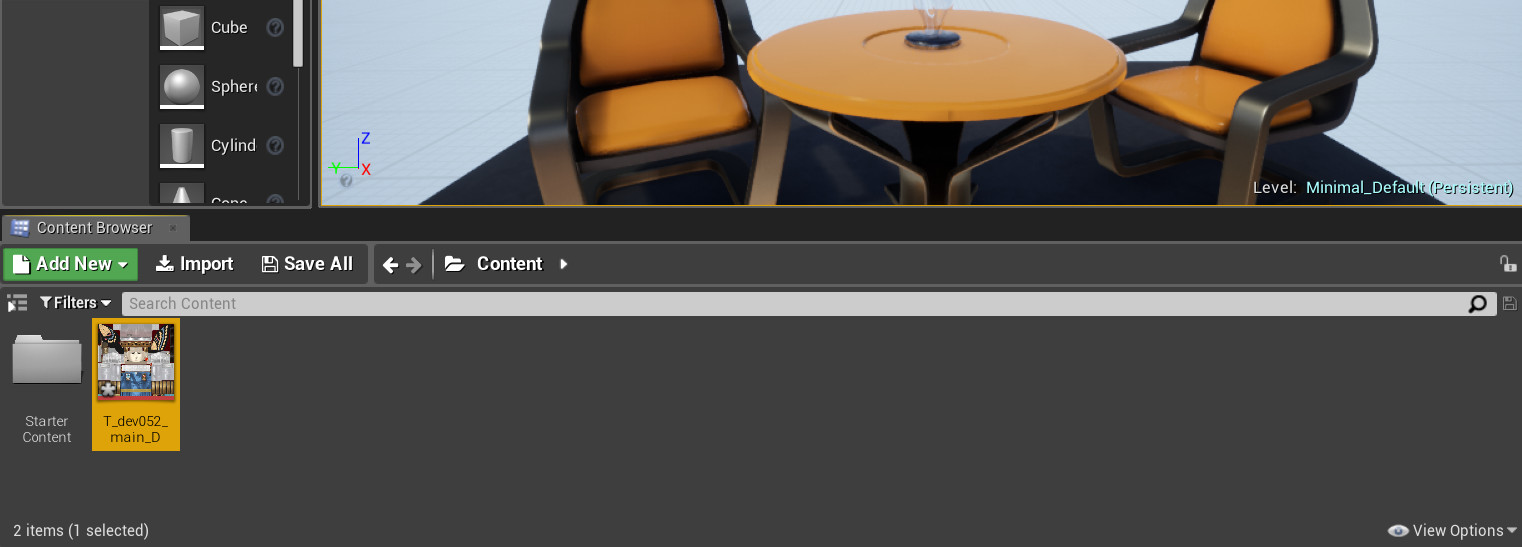
Doubleclick the texture file on the bottom in the Content Browser panel, and the Details window should pop up.
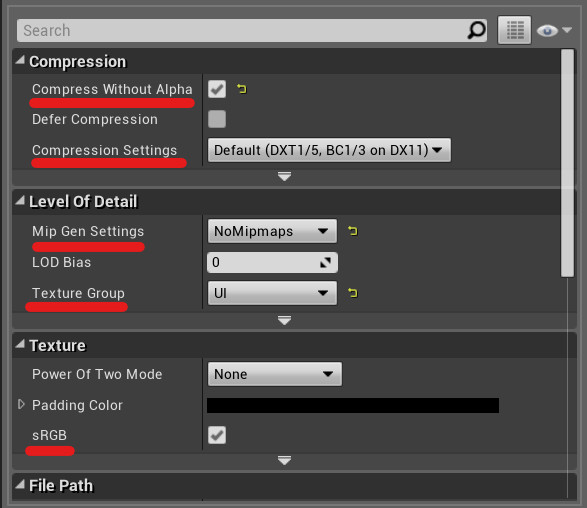
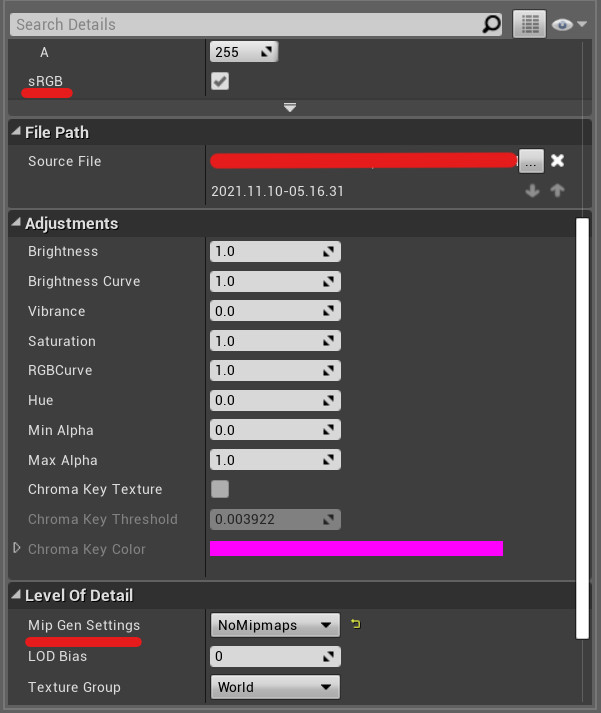
The settings you need to take a look at, which are underlined in red, are:
- Compress Without Alpha: If your texture has an alpha channel, check the checkbox. If you’re not sure whether it does have an alpha, check the box anyway.
- Compression Settings: Set to either “Default (DXT1/5)” or “UserInterface2D (RGBA)”.
- Mip Gen Settings: Set to “NoMipmaps”, as having mipmaps will kill the game.
- Texture Group: Set to “UI”.
- sRGB: Make sure it’s on and that the checkbox is checked, or else the texture will appear lighter than it should be ingame.
After that, save the texture (via the big ol’ Save button in the top left if you prefer), then navigate to the main UE4 Project Manager window once more and go to File > Cook Content for Windows.
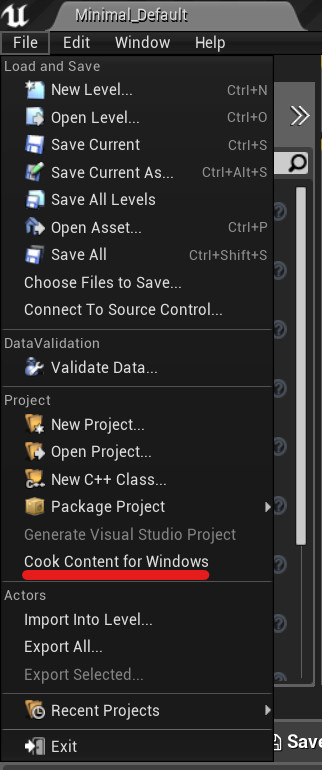
Wait as it cooks. It’ll play a sound and display a popup message in the bottom right corner when it’s done.

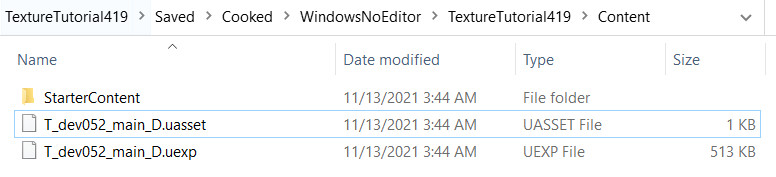
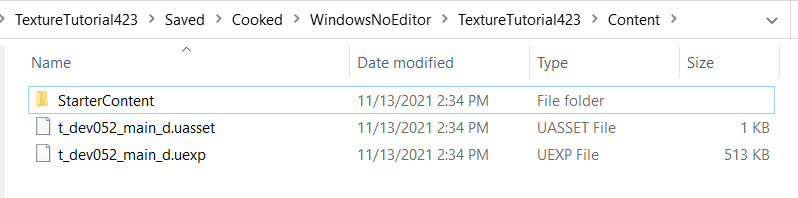
This will save the edited texture in the selected Project folder as a .uasset, with an accompanying .uexp file. The folder structure is typically:(project folder)/Saved/Cooked/WindowsNoEditor/(project name)/Content/
For me, I named my project “TextureTutorial419”, so the whole path is:TextureTutorial419/Saved/Cooked/WindowsNoEditor/TextureTutorial419/Content/
Swizzling the Texture
Next we have to swizzle the texture in order for it to actually show up ingame.
Drag and drop the cooked .uasset file onto Swizzle.cmd, which is located in the Noesis plugin folder, and it should export a PNG file with the same name.
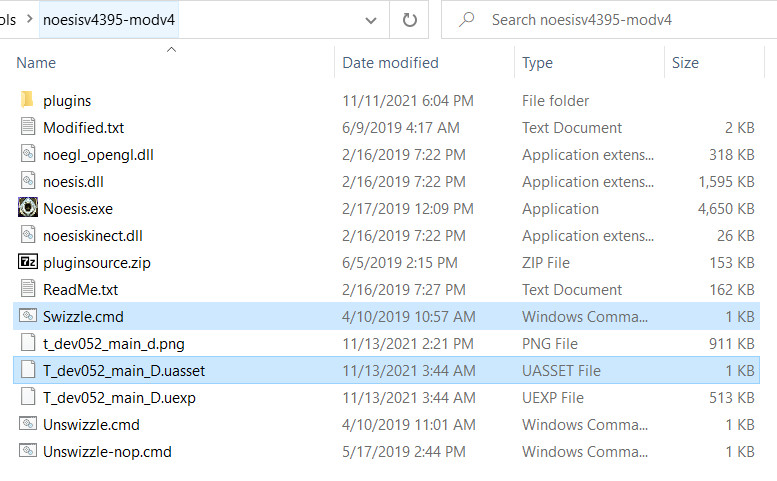
If you open the PNG up, you’ll notice that it looks kind of weird.
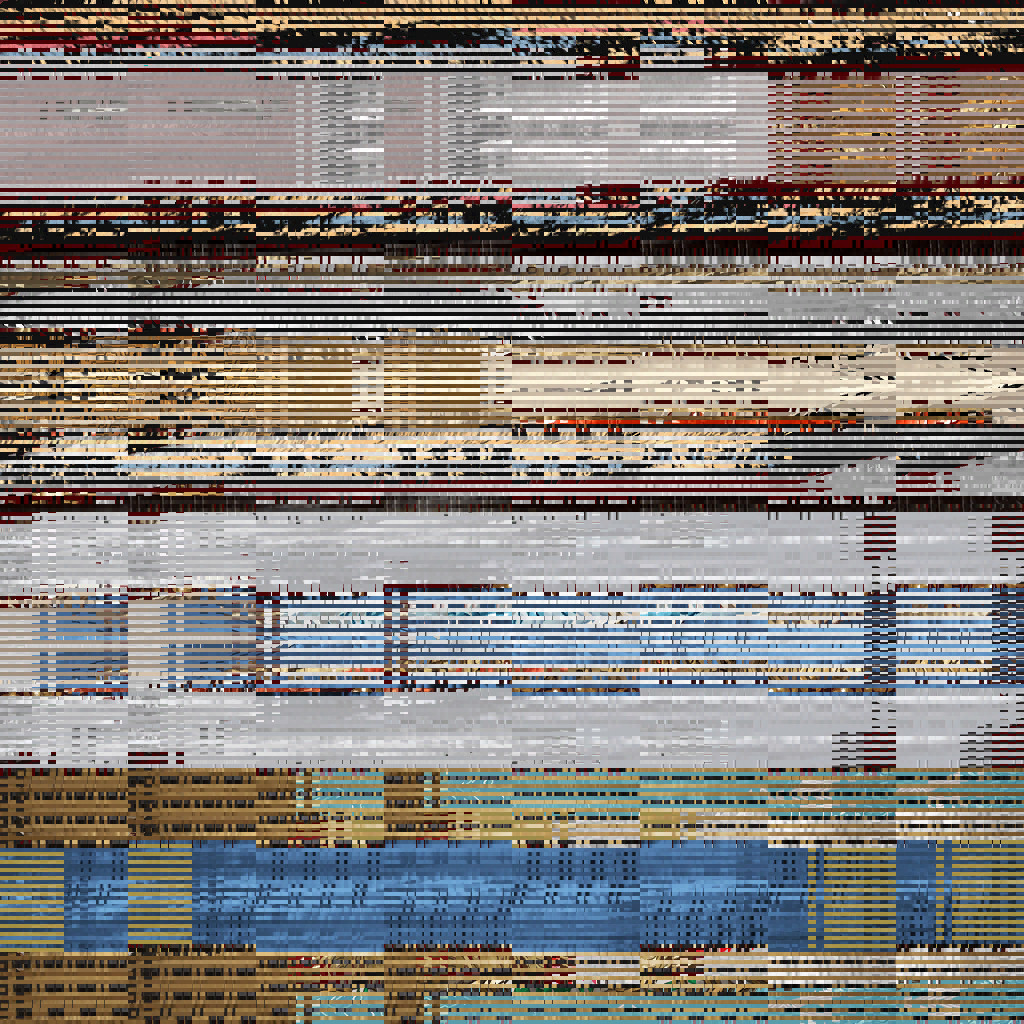
This is supposed to happen. “Swizzling” a texture means putting image vectors in a form that’s easier for the GPU to read. It’s done for the sake of performance, as the GPU reads the texture faster if it’s swizzled. In our case, we swizzle textures because texture mods straight up won’t work ingame unless we do so.
Cooking the Texture via UE 4.23
Now that we have our edited texture swizzled and saved with the proper 4.19 settings, open up Unreal Engine 4.23 this time.
Note: If you are working with a texture that has alpha, at this point, you should have:
- Saved the alpha separately from the original texture, as a separate file
- Edited the texture (not the alpha, unless necessary)
- Cooked the edited texture in 4.19
- Cooked the alpha texture in 4.19
- Swizzled the edited texture via the Noesis plugin
- Swizzled the alpha texture via the Noesis plugin
- Combined the swizzled alpha and swizzled edited texture together in an image editor by pasting the swizzled alpha as an alpha channel, before proceeding to the next step of cooking the texture via 4.23.
Create a UE 4.23 project, and name it whatever you’d like. This, too, is mostly used for intermediary purposes. I named this project “TextureTutorial423”.
Drag and drop the swizzled PNG (which you saved with 4.19 and swizzled via the Noesis plugin) into the Content Browser on the bottom. Then, doubleclick the swizzled PNG to bring up the Details window for it, and tweak its settings again.
Look at:
- sRGB: Make sure it’s checked on, just like before.
- Mip Gen Settings (near the bottom this time, under “Level of Detail”): Set to “NoMipMaps”, just like before.
Character UI
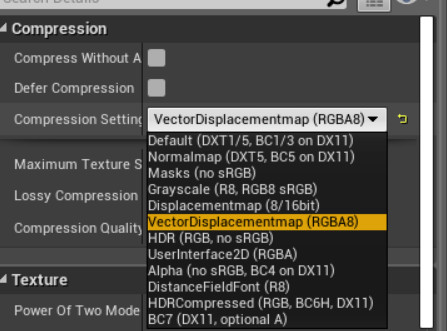
If you’re editing character UI in particular (e.g. the player battle portrait texture), you also need to look at:
- Compression Setting: Set as VectorDisplacementmap (RGBA8)
Save the swizzled PNG, and cook it again in UE 4.23, via “Cook Content for Windows” in the File menu. Just like before, this will export the PNG into a .uasset file with a .uexp file, in the appropriate UE 4.23 project folder.
For me, this is in: TextureTutorial423/Saved/Cooked/WindowsNoEditor/TextureTutorial423/Content/
Repacking the Final Texture
To repack the texture, use UnrealPak. Create a folder for your mod (you can name the folder anything you want), and inside of it, recreate the folder structure as it originally was in the game’s romfs folder, for all the paths to assets that you want to repack.
Since I’m only repacking one texture, Oberon’s main body, I only need to recreate:(mod folder)/Project/Content/Design/Character/Devil/dev052_oberon/Texture/
But if you also edited other assets in your mod (e.g. You also edited the texture for another NPC or demon or something), then you will have to recreate the appropriate folder paths for the assets you edited as well.
Drop the edited .uasset and .uexp files into the appropriate (recreated) folders in your mod folder.

After that, drag and drop the mod folder onto UnrealPak-With-Compression.bat. The compression makes sure that the mod doesn’t have an unnecessarily gigantic filesize.
This should export a .pak file named after your mod folder. I named mine “TextureTutorial”, so it outputs TextureTutorial.pak.
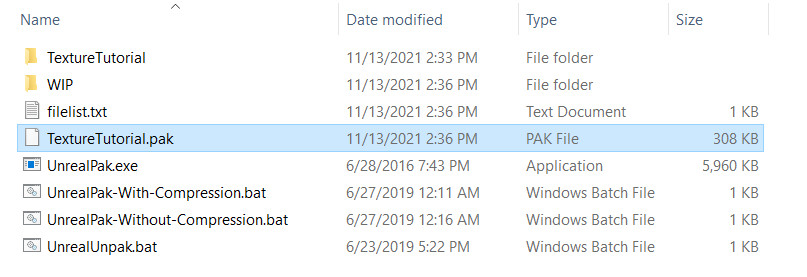
The .pak name doesn’t matter unless it’s directly in /Paks/ and not in /Paks/~mods/. Since we’re putting the mod .pak in /Paks/~mods/, we’re free to name it whatever we want.
Putting it in the Game
Now that you’ve got your mod .pak, it’s time to actually put the mod into the game and test it out.
With Yuzu
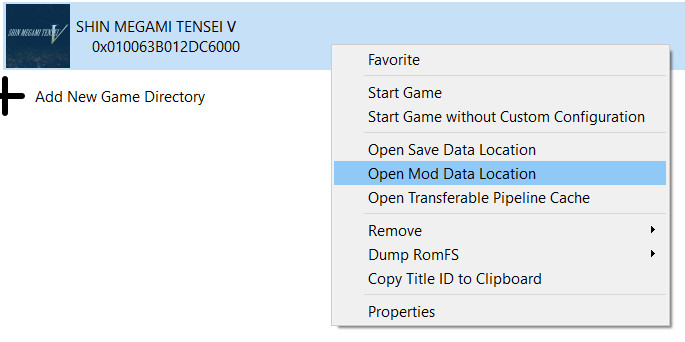
Go to the mod folder location by right-clicking the game title in Yuzu and selecting “Open Mod Data Location”.
In the game’s folder, create the folder for your mod, and then inside it, create the following folder structure:/romfs/Project/Content/Paks/~mods/
When you put your mod .pak into that folder, the whole folder path should look like:(Game’s mod data location)/(mod folder name)/romfs/Project/Content/Paks/~mods/
Put your mod .pak file in the /~mods/ folder in Yuzu.

With Unverum
Upon creating a new mod in Unverum, it will copypaste your mod .pak into the correct mod folder for you.
However you choose to manage your mod, boot up your game afterwards and see the results of your handiwork.

Enjoy!