Hướng dẫn thay thế ổ đĩa quang trên Sony PlayStation 4
Trên các mẫu PS4 dòng 1XXX series, bo mạch con của ổ đĩa quang (optical drive daughterboard) và bo mạch chủ (motherboard) được ghép cặp với nhau. Nếu bo mạch con bị hỏng, bạn sẽ phải thay cả bo mạch chủ.
Bạn có thể thay thế cụm ổ đĩa quang (optical drive assembly) riêng lẻ, nhưng cụm thay thế phải tương thích với bo mạch con của ổ đĩa quang.
Hãy rút nguồn điện PS4 trước khi bắt đầu bất kỳ thao tác sửa chữa nào.
- Bước 1: Lật ngược máy PS4
 Bước 1:
 - Lật ngược PS4 sao cho mặt lưng (phía sau máy) hướng về phía bạn.
- Bước 2:
- Tháo các tem bảo hành.
 Tool
Tool  Bước 2:
 - Dùng nhíp gỡ bỏ hai miếng tem ở giữa mặt lưng PS4 để lộ ra hai con ốc vỏ máy.
- Bước 3:
- Tháo các nắp nhựa che ốc.Bước 3:
- Dùng nhíp cẩn thận tháo các nắp nhựa che ốc ở mỗi góc, để lộ thêm hai con ốc vỏ máy.
- Bước 4:
- Tháo các ốc ở mặt lưng máy.Bước 4:
- Tháo bốn con ốc bảo mật Torx 7,2 mm ở mặt sau của PS4.
- Bước 5:
- Tháo vỏ dưới của máy.Bước 5:
- Dùng ngón tay cái để nhấc vỏ dưới lên và tháo ra khỏi PS4.
- Vỏ dưới được giữ cố định bằng các ngàm nhựa, bạn có thể cần dùng lực khá mạnh để tách vỏ ra. Bước 6:
- Dùng nhíp kéo thẳng cáp nguồn ra để ngắt kết nối bộ nguồn (PSU) khỏi bo mạch chủ.
- Nếu đầu nối bị kẹt, hãy dùng spudger (cần gỡ nhựa) để nhẹ nhàng bẩy đầu nối ra.
- Bước 7:
- Tháo bộ nguồn (Power Supply Unit).Bước 7:
- Tháo ba con ốc bảo mật Torx TR8 dài 9,7 mm.
- Tháo hai con ốc Phillips dài 41 mm cùng với các thanh giữ (brackets).Bước 8:
- Nhấc bộ nguồn (PSU) thẳng lên và ra khỏi PS4.
- Bộ nguồn được giữ chặt bởi các ngàm ở phía bên trái, có thể bạn sẽ cần thử vài lần mới tháo ra được.
- Khi lắp lại, hãy đảm bảo các ngàm được căn chỉnh đúng vị trí, rồi nhấn bộ nguồn vào chỗ.
- Bước 9:
- Tháo ăng-ten Wi-Fi.Bước 9:
- Dùng đầu spudger (cần gỡ nhựa) để tháo cáp ăng-ten ra khỏi bo mạch chủ.
- (Phần quảng cáo khóa học Microsoldering mình bỏ qua vì không liên quan đến hướng dẫn sửa PS4).
- Bước 10:
- (… tiếp theo sẽ là thao tác mới trong bước 10).Tool Bước 10:
- Dùng nhíp hoặc ngón tay để giữ lấy dây cáp ăng-ten, rồi đưa nó ra khỏi rãnh dẫn cáp (cable guides).
- Dùng nhíp hoặc ngón tay để luồn dây cáp ăng-ten ra khỏi vị trí bên dưới cáp ổ đĩa quang.
- Tháo ốc bảo mật Torx dài 9,7 mm đang cố định ăng-ten.
- Tháo ăng-ten Wi-Fi.
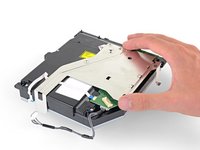
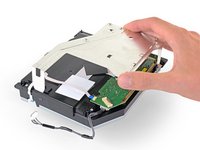
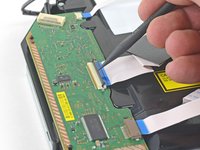
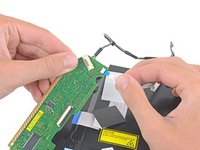
Tool Dùng móng tay nhấn xuống cần gạt kim loại để nhả cáp ruy-băng nằm trên ổ đĩa quang. - Dùng ngón tay hoặc nhíp để rút cáp ruy-băng ra, nắm vào tab màu đen và kéo.
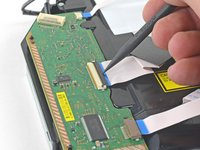
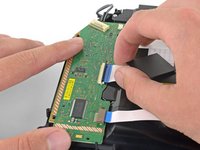
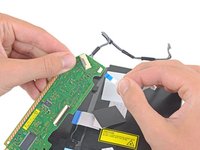
- Khi lắp lại, bạn không cần nhấn cần gạt kim loại. Bạn sẽ nghe thấy “tách” (click) khi cáp đã được cắm vào đúng vị trí.Dùng móng tay nhấn xuống cần gạt kim loại để nhả cáp ruy-băng kết nối với bo mạch chủ.
- Dùng ngón tay hoặc nhíp để rút cáp ruy-băng ra bằng cách kéo vào tab màu đen.
- Đặt cáp ruy-băng sang một bên để sử dụng lại khi lắp ráp.
- Khi lắp lại, bạn không cần nhấn cần gạt kim loại. Bạn sẽ nghe thấy “tách” (click) khi cáp đã được cắm chắc chắn.
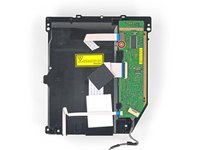
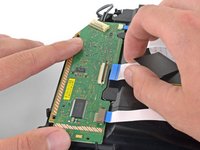
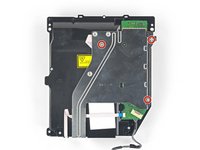
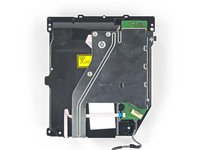
- Dùng ngón tay hoặc nhíp để tháo cáp ổ đĩa quang ra khỏi bo mạch chủ.
- Dùng ngón tay hoặc nhíp để tháo cáp ổ đĩa quang ra khỏi các rãnh giữ cáp.
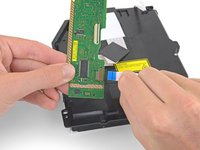
Tháo các ốc cố định ổ đĩa quang, gồm có:- Ba ốc Torx dài 9,7 mm
- Một ốc Phillips dài 6,2 mm
- Nhấc ổ đĩa quang thẳng lên và lấy ra khỏi PS4.
Lưu ý: - Nếu bạn đã mua ổ đĩa quang kèm sẵn bo mạch PCB và giá đỡ (bracket), hãy bỏ qua các bước còn lại và tiến hành lắp ráp lại.
- Bước 19:
- Tháo ba con ốc Phillips dài 6,2 mm khỏi giá đỡ kim loại.
- Nhấc giá đỡ kim loại thẳng lên để tách nó ra khỏi ổ đĩa quang.
 Bước 1:


 Tool
Tool 

 Bước 2:


 Bước 3:


 Bước 4:


 Bước 5:


 Bước 6:


 Bước 7:


 Bước 8:


 Bước 9:


 Bước 10:


 Dùng móng tay nhấn xuống cần gạt kim loại để nhả cáp ruy-băng nằm trên ổ đĩa quang.


 Dùng móng tay nhấn xuống cần gạt kim loại để nhả cáp ruy-băng kết nối với bo mạch chủ.


 Tháo các ốc cố định ổ đĩa quang, gồm có:


 Lưu ý: