
A new update has been released for the PS5 version of Playstation 4 Save Mounter , the tool allows us to mount, read and modify game saves.
This tool allows you to mount save data in READ/WRITE mode , providing useful features for managing and editing saves.
The update introduces support for 3.20 offsets, thanks to the contribution of developer @danilaltd .
Main features
With the updated PS4 Save Mounter , users can:
- Create decrypted copies of your saves, making them easily accessible.
- Replace save files with modified versions.
- Share saves with other users.
- Create new save files.
However, the tool has some limitations. You cannot:
- Replace files with encrypted saves.
- Use the tool on non-exploitable consoles.
Requirements
In order to use PS4 Save Mounter , you need:
- An FTP client like FileZilla to access the console files.
- The latest version of ps5debug ( download here ).
- The ability to run files compatible with .NET Framework 2.0 , a requirement supported even by older operating systems like Windows 98.
Guide
Preparation
- Launch ps5debug on your console.
- Run a game on the PlayStation 5.
- Connect to the console using an FTP client.
Assembling Save Games :
- Load ps5debug on your console.
- Start a game from the console.
- Load an FTP client to access the console files.
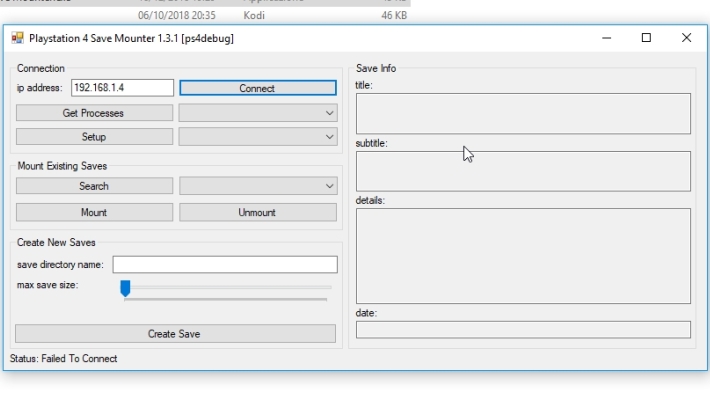
- Open the PS4 Save Mounter tool .
- Enter the IP address of the console and click “Connect” .
- Click on “Get Processes” and select the game from the drop-down list.
- Click on “Setup” .
- Click on “Search” .
- Select the save you want to mount from the drop-down menu.
- Select the mounting permissions from the drop-down menu (default: READ ONLY ).
- Click on “Mount” .
Now your save is mounted and accessible via FTP in the directories:/mnt/pfs//mnt/sandbox/{title}/savedataX
(they are identical, only the route changes) .
- After copying or replacing files, click “Unmount” .
Note : Do not replace the files in the directorysce_sys , it is useless and may corrupt the save.
Saves with prefixsce_
Some games use a different save format, with the prefix sce_. These files are located in /user/home/{userid}/savedata/{titleid}and do not appear in the tool’s search results.
Alternative solution
- Go to
/user/home/{userid}/savedata/{titleid}. - Make a copy of the files
sce_, which include:- One file
.bin(96 KB). - A . file
sdimg.
- One file
- Rename files:
sce_sdmemory.bin->temp.bin.sdimg_sce_sdmemory->sdimg_temp.
- Go to
/system_data/savedata/{userid}/db/userand download the filedatabase.db. - Open the file with a SQLite editor.
- Add a new record to the table
savedataand fill in the necessary fields. - Replace the original database with the modified one.
- Return to the tool and click “Search” again : a new temporary entry should appear in the drop-down menu.
- Proceed as usual to mount the rescue.
File Recoverysce_
- Return to
/user/home/{userid}/savedata/{titleid}. - Delete the original files
sce_sdmemory.binandsdimg_sce_sdmemory. - Rename:
temp.bin->sce_sdmemory.bin.sdimg_temp->sdimg_sce_sdmemory.
- Replace the modified database with the original one.
Changelog
- Added offsets for version 3.20, thanks to @danilaltd .
Download: Save Mounter v1.3.1-ps5-r5
Download: Source code Save Mounter v1.3.1-ps5-r5
Source: github.com