
Bạn muốn sử dụng ổ cứng SATA 2.5 inch thông thường làm ổ cứng chính cho Xbox 360 mà không cần mua vỏ ổ cứng chuyên dụng đắt tiền của Microsoft? Bản mod này cho phép bạn kết nối trực tiếp ổ cứng ngoài vào cổng SATA nội bộ của máy Xbox 360.
1. Ý Tưởng Và Lợi Ích
- Tiết kiệm chi phí: Sử dụng bất kỳ ổ cứng laptop (SATA 2.5″) hoặc SSD nào có sẵn.
- Tăng dung lượng: Dễ dàng nâng cấp lên dung lượng cao hơn (lên đến 2TB cho máy đã hack JTAG/RGH).
- Tiện lợi: Dễ dàng tháo lắp ổ cứng để chép game từ máy tính mà không cần tháo vỏ máy Xbox.
- Tản nhiệt: Ổ cứng đặt bên ngoài giúp máy chạy mát hơn, giảm nhiệt lượng tích tụ bên trong vỏ.
2. Linh Kiện Cần Chuẩn Bị
- Cáp nối dài SATA (SATA Extension Cable): Một đầu đực (Male) và một đầu cái (Female).
- Dây cấp nguồn: Cần trích xuất nguồn 5V từ bo mạch chủ Xbox 360 để cấp cho ổ cứng.
- Dụng cụ: Mỏ hàn, thiếc hàn, ống co nhiệt và bộ tuốc nơ vít mở máy Xbox 360.
3. Các Bước Thực Hiện Chính
Bước 1: Chuẩn Bị Cổng Kết Nối
- Tháo máy Xbox 360 để tiếp cận khu vực cổng kết nối ổ cứng gốc trên bo mạch chủ.
- Sử dụng cáp nối dài SATA. Cắt bỏ phần vỏ nhựa thừa ở đầu cắm để đảm bảo nó khớp khít với cổng SATA trên Xbox.
Bước 2: Câu Dây Nguồn (Wiring)
- Tín hiệu dữ liệu: Cắm đầu đực của cáp SATA vào cổng SATA của Xbox.
- Cấp nguồn: Vì cổng SATA của Xbox 360 có sơ đồ chân nguồn riêng biệt, bạn cần hàn dây nguồn 5V và dây mòng (GND) từ các điểm tiếp điểm trên bo mạch chủ (thường lấy từ khu vực cấp nguồn cho ổ đĩa DVD hoặc cổng HDD gốc).
- Lưu ý: Hãy kiểm tra kỹ sơ đồ chân (Pinout) của Xbox 360 để tránh hàn nhầm dây 12V gây cháy ổ cứng (ổ 2.5″ chỉ dùng 5V).
Bước 3: Đưa Cáp Ra Ngoài
- Khoét một lỗ nhỏ ở phía sau vỏ máy Xbox 360 (gần khu vực cổng Ethernet hoặc AV) để đưa đầu cái của cáp SATA ra ngoài.
- Cố định dây cáp bằng keo nến hoặc vòng đệm cao su để tránh dây bị co kéo làm hỏng mối hàn bên trong.
4. Cách Sử Dụng
- Kết nối ổ cứng SATA 2.5″ vào đầu cáp đã đưa ra ngoài.
- Bật máy Xbox 360.
- Vào phần Settings > System > Storage để định dạng (Format) ổ cứng mới.
- Lưu ý: Đối với máy chưa hack, bạn cần dùng ổ cứng đúng phân vùng của Microsoft. Với máy đã hack RGH/JTAG, máy sẽ nhận diện mọi loại ổ cứng.
Thông số kỹ thuật tối ưu SEO:
- Từ khóa chính: Mod ổ cứng Xbox 360, Cách gắn ổ cứng ngoài cho Xbox 360, Xbox 360 HDD Internal to External, Độ ổ cứng Xbox 360.
- Từ khóa phụ: Cáp SATA cho Xbox 360, Xbox 360 RGH HDD mod, Sơ đồ nguồn HDD Xbox 360, Nâng cấp ổ cứng Xbox 360 giá rẻ.
- Meta Description: Hướng dẫn chi tiết cách mod chuyển cổng ổ cứng nội bộ ra bên ngoài cho Xbox 360. Giải pháp tiết kiệm giúp sử dụng mọi loại ổ cứng SATA cho máy chơi game của bạn.
Bản mod này cực kỳ hữu ích cho những “vọc sĩ” muốn tùy biến hệ thống lưu trữ của Xbox 360 một cách linh hoạt và tối ưu nhất!
THE IDEA
This mod is to externalise the Xbox 360s FATs internal disc drive into a Xbox 360 HD-DVD drive enclosure. So that I can either:
- Have an extra CPU heatsink on the GPU while at the same time retaining the ability to play or rip game discs on my JTAG Xbox 360s.
- Use the drive as an 0800 ripping drive.
PERCENT COMPLETE
100%
TASKS
Complete:
Prepare the Xbox 360 disc drive
Create the Xbox 360 Internal to external adapter plate
Create and build the HD-DVD enclosure replacement interface PCB design
Create the cables
Not Complete:
XBOX 360:
The internal to external connections are accessible all of the time from the disc drive tray area.
Internal to external Bracket:
In the place of the of the disc drive is a bracket that has the eject switch, external drive power connector and SATA port. The bracket metal is from the side of a PC power supply that has been cut off and down to what you see. I drilled, cut and filed the ports into the bracket. It mounts using screws going through holes that already exist in the Xbox 360 motherboard metal tray
Internal Cables:
The internal to external power cable is from an original Xbox as it is the perfect length. It has been rewired to suite my needs. The internal to external SATA cable ends are an eSATA bracket mount to regular SATA end. The eject button has been wired directly to the eject switch on the Xbox 360 motherboard.
Xbox 360 disc drive power pinout.
XBOX 360 DISC DRIVE:
Modifications:
All that is required to make the Xbox 360 disc drive fit perfectly into the HD-DVD enclosure the plastic legs need to be removed. After that modification the disc drive will sit perfectly where the HD-DVD drive sat. As pictured any of the plastic legs below the red needs line to go.
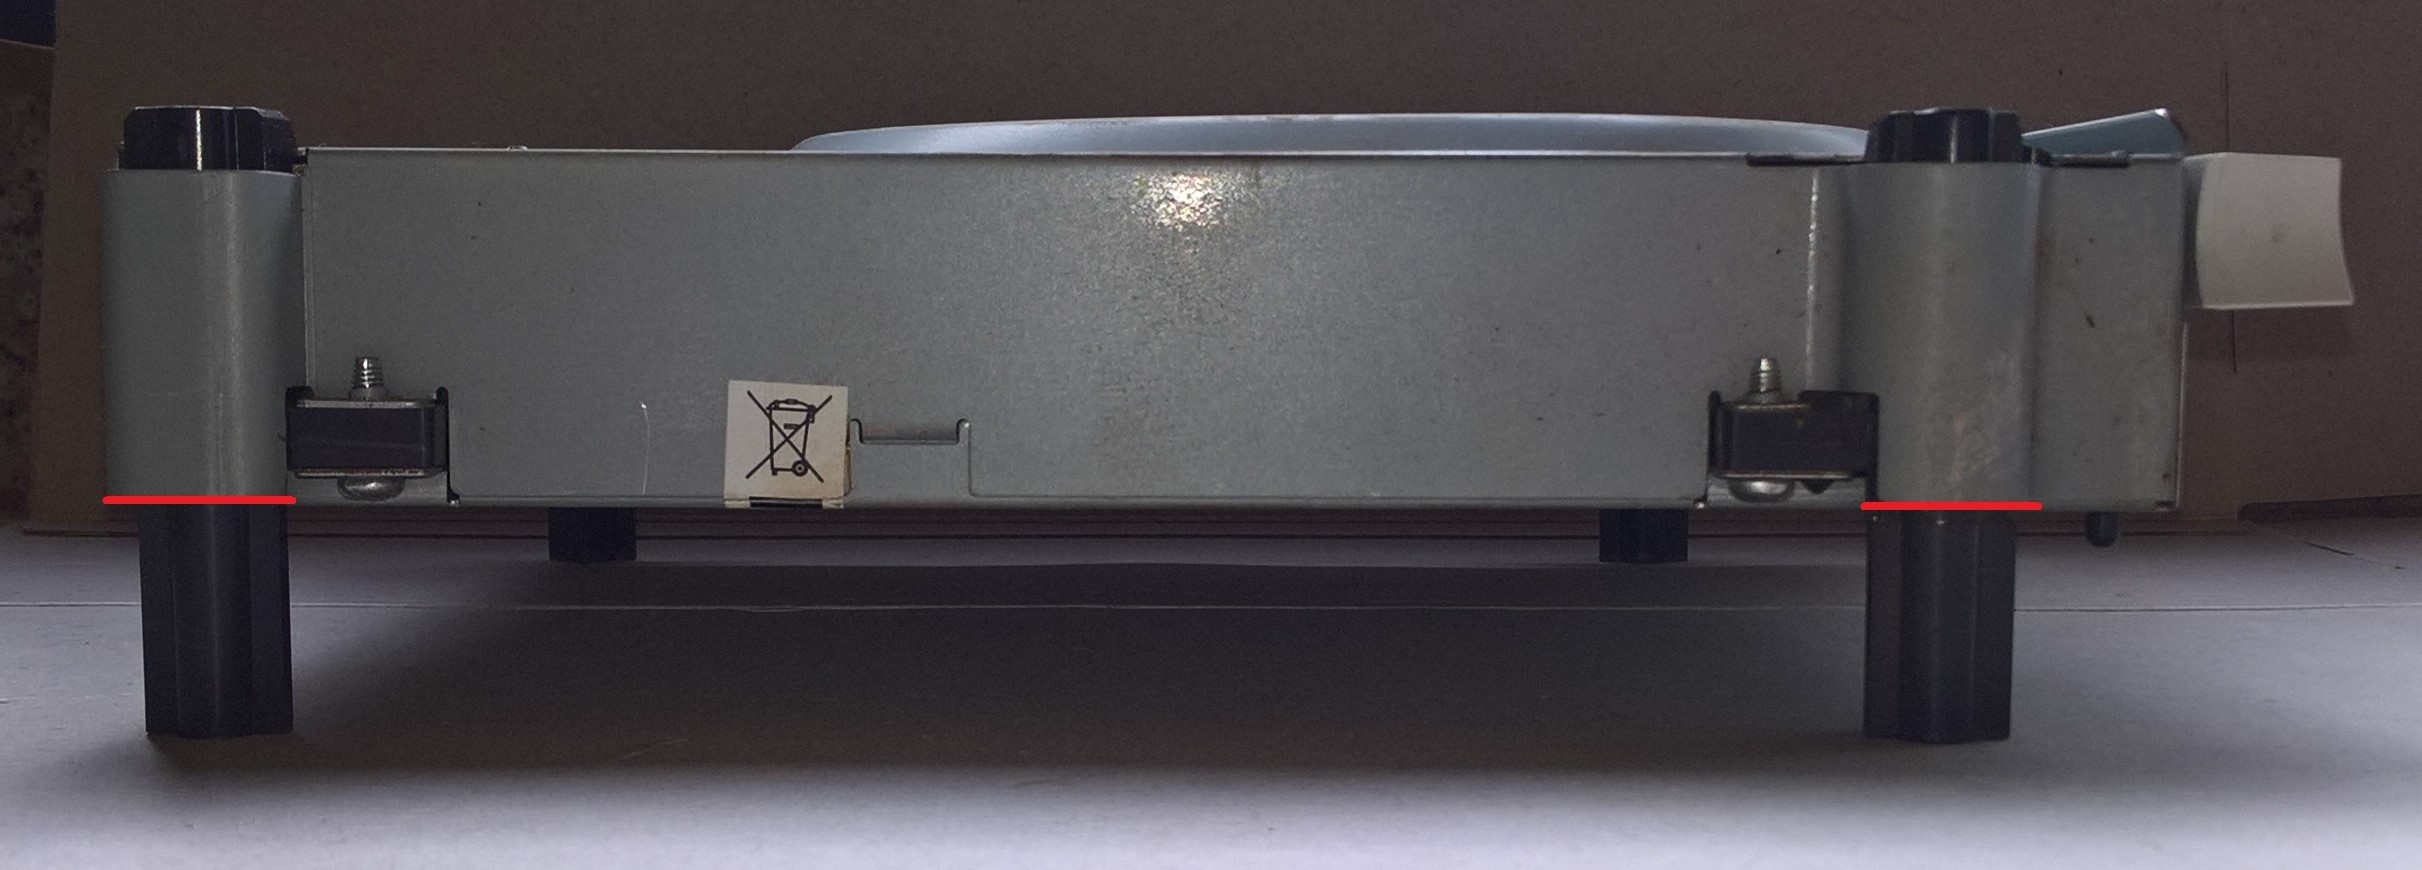
TIP: Get a hacksaw, lay the blade flat against one side of the drive front and back legs outer metal where the plastic legs go through and slide hacksaw back and forward to cut off two plastic legs off perfectly even with the metal that the legs go through. Then do the other sides two legs.
Drive Tray Facia:
To make the HD-DVD drive tray facia fit on the Xbox 360 Lite-On disc dive a piece of the tray that sticks out must be removed so that the drive front around that area is flat. As seen outlined in red in the following pictures.
Before.
XBOX 360 HD-DVD DRIVE:
Modifications:
No permanent modifications are required on the actual HD-DVD drive enclosure.
Adapter PCB:
I will be replacing the HD-DVD drive USB connectors with a custom made PCB that I designed which will have the eject / fan / LED connector, drive SATA ports and power connectors. Without modifying the HD-DVD drive the PCB will have 2mm spacers between it and the HD-DVD plastic mounting screw locations which stops the PCBs SATA port colliding with the black metal frame.


NOTE: Without modifying the HD-DVD Drive the rear external power and SATA ports will be recessed a bit but they are still easily accessible from my experience
External to Internal Cables:
The cables used inside the HD-DVD enclosure include the Xbox 360 drive SATA and power cable. The Xbox 360 drive power cable had to be rewired to suite my needs.
Powering:
I’ll just run the power directly from the Xbox 360 with the extended 20 inch disc drive power cable I’ve got.
Eject and LED:
The original HD-DVD drive eject and LED circuit board remains in place but I’ve added an LED to above the eject button then have run wires from the LED legs and eject button solder points back to my custom made circuit board.

Replace the Capacitor:
While your inside the HD-DVD drive enclosure take the time to replace the largest capacitor on the power board before it fails and ruins the PCB. The capacitor is yellow and green and is manufactured by SANYO and is rated as 16V 1500uF. I’ve got ten HD-DVD drives and nine contained that exact capacitor. Of those nine eight were bulging and/or leaking, the ninth I replaced anyway before it could fail. The tenth was still OK and different coloured so I assume it to be from a different manufacturer so should be OK.
EXTERNAL CABLES
Are an ESATA to regular SATA end cable and a 20 inch extended disc drive power cable. See the following for eBay item auction details for the disc drive power cable.
eBay seller ocean515732.
eBay seller store.
Ebay Item.- Auction is for Xbox One cause its cheaper than the Xbox 360 auction and also contains the required 11th wire.
PICTURES

FOR SALE